
Brake fluid plays a vital role in maintaining the safety and proper functioning of your vehicle. Over time, it absorbs moisture and becomes less effective, which can lead to reduced braking performance. In this detailed blog, we’ll show you how to flush brake fluid step by step, what tools you need, how often to do it, and when to seek professional help from a trusted auto repair Houston. Whether you’re a seasoned DIYer or just trying to understand more about your vehicle, this article has everything you need.
If you’re searching for ‘auto repair near me,’ we’re here to help — book your service today.
Why Flushing Brake Fluid Is Important
1. Prevents Brake Failure
Brake systems rely on hydraulic pressure. When brake fluid absorbs moisture (which it naturally does over time), its boiling point drops. During heavy braking, this moisture can vaporize, causing a dangerous condition known as vapor lock, where the brake pedal feels soft or even goes to the floor. If you experience any of these symptoms, it’s a good idea to seek professional car brake repair services to ensure your vehicle’s braking system is functioning safely.
2. Protects Brake Components
Old, contaminated brake fluid can lead to corrosion inside your braking system. Moisture and debris can damage expensive components like brake calipers, wheel cylinders, master cylinders, and ABS units. Flushing the fluid helps prevent costly repairs.
3. Ensures Consistent Braking Performance
Fresh brake fluid maintains optimal hydraulic pressure, ensuring that when you press the brake pedal, your vehicle responds promptly and predictably. This is especially important in emergency situations where every fraction of a second counts.
How Often Should You Flush Brake Fluid?
Most vehicle manufacturers recommend flushing brake fluid every 2 to 3 years or every 30,000 miles, whichever comes first. However, this may differ based on the vehicle’s make, model, and driving habits.
Signs You Need a Brake Fluid Flush
- Spongy or soft brake pedal
- Discolored brake fluid (dark brown or black)
- ABS warning light is on
- Unusual brake noises
- Brake fade during long drives
How to Check Brake Fluid Condition
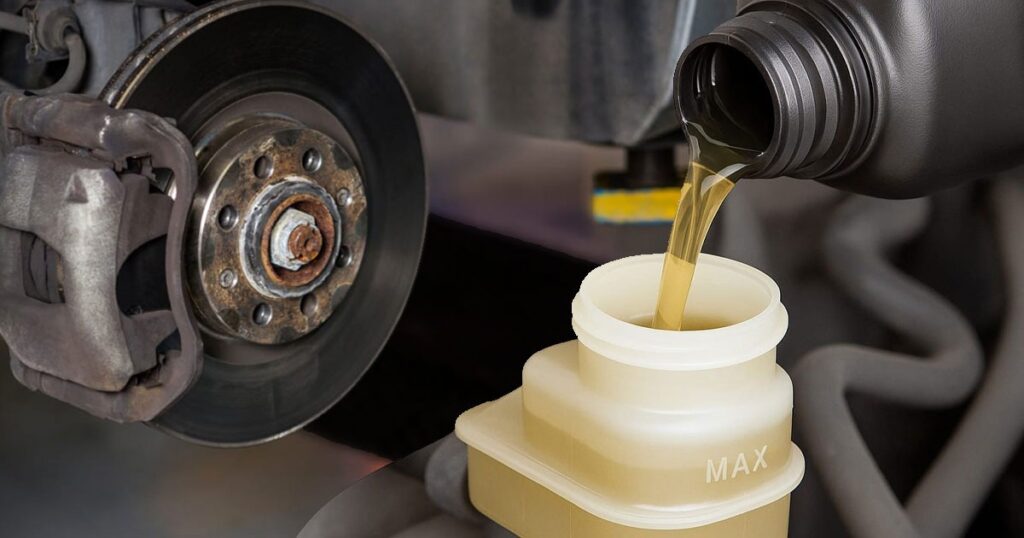
Open the reservoir and inspect the brake fluid’s condition. Good fluid should be clear to light yellow. If it looks dark, cloudy, or dirty, it’s time for a flush. Make sure the fluid level sits between the “MIN” and “MAX” marks. A low level may signal a leak or worn brake pads that require inspection.
Choosing the Right Brake Fluid
Selecting the proper brake fluid is essential for maintaining your car’s braking performance and safety. Brake fluids transfer force from your foot to the brake components, and different types are designed to handle different levels of heat and moisture. DOT 3 and DOT 4 are the most common types found in passenger vehicles. Understanding their unique properties can help you make the right choice for your vehicle’s needs.
| Characteristic | DOT 3 | DOT 4 |
| Dry Boiling Point | Around 401°F (205°C) | Around 446°F (230°C) |
| Wet Boiling Point | Approximately 284°F (140°C) | Approximately 311°F (155°C) |
| Moisture Absorption | Slower moisture uptake, retains properties longer | Absorbs moisture more rapidly, reducing lifespan |
| Best Fit For | Everyday driving – sedans, compact cars, and light-duty vehicles | Demanding conditions – performance cars, heavy-duty trucks, towing |
| Maintenance Needs | Longer intervals between brake fluid changes | Needs more frequent replacement due to faster degradation |
Tools and Supplies You’ll Need
Before getting started, gather these tools and supplies:
- Fresh brake fluid (refer to your owner’s manual to confirm the correct type: DOT 3, DOT 4, or DOT 5.1).
- Wrench or socket set (for bleeder screws)
- Turkey baster or fluid syringe (to remove old fluid from the reservoir)
- Clear plastic tubing (to monitor fluid color)
- Catch container (to collect old fluid)
- Jack and jack stands (to safely lift and support your vehicle).
- Wheel chocks (to prevent rolling)
- Gloves and safety goggles (for protection)
- Brake cleaner (to clean up spills)
- A helper (optional but helpful for the bleeding process)
Step-by-Step Guide: How to Flush Brake Fluid
1. Prepare Your Vehicle
- Park the car on a flat surface.
- Engage the parking brake.
- Place wheel chocks behind the rear wheels.
- Pop the hood and locate the brake master cylinder reservoir.
- Clean around the cap to prevent contamination.
- Use a turkey baster to suck out as much old brake fluid as possible.
2. Refill with New Brake Fluid
- Pour fresh brake fluid into the reservoir until it reaches the “MAX” fill line.
- Keep the cap loosely in place to prevent contamination while allowing airflow.
3. Lift the Vehicle and Remove the Wheels
- Loosen lug nuts before lifting the car.
- Raise the vehicle and stabilize it safely using jack stands.
- Remove all four wheels to reach the brake calipers and bleeder screws.
4. Bleed the Brake Lines
Start bleeding at the brake farthest from the master cylinder. The typical bleeding order is:
- Rear passenger
- Rear driver
- Front passenger
- Front driver
Bleeding Procedure:
- Connect a clear hose to the bleeder screw and place the opposite end into a container.
- Have your helper pump the brake pedal 3-5 times and hold it down.
- Loosen the bleeder screw slightly. Old fluid and air will flow out.
- Tighten the screw before the pedal is released.
- Repeat until clean, bubble-free fluid comes out.
- Check the fluid reservoir often and refill as needed.
5. Repeat for All Wheels
Flush each wheel in the proper order, always ensuring the reservoir stays filled.
6. Final Checks
- Once all lines are flushed, top off the reservoir.
- Reinstall the wheels and securely tighten the lug nuts to the recommended torque.
- Lower the vehicle and remove jack stands.
- Press the brake pedal several times to rebuild pressure.
- Test drive slowly in a safe area to ensure proper brake operation.
Tips for a SafeBrake Fluid Flush
- Always use the correct type of brake fluid. Mixing types can cause damage.
- Keep the reservoir full throughout the process to avoid introducing air.
- Dispose of old brake fluid properly. It is hazardous waste.
- Use gloves and eye protection. Brake fluid is corrosive and can harm skin and paint.
- Label your brake fluid bottle. Unused fluid can absorb moisture once opened.
Trust Eric’s Car Care for Expert Brake Service in Houston, TX
Not comfortable flushing brake fluid yourself? No problem. Eric’s Car Care in Houston, TX offers expert brake services performed by ASE-certified technicians. From fluid flushes to pad replacements, we use top-quality parts and equipment to keep your vehicle safe.
Located in the heart of Houston, we pride ourselves on honest service, fair pricing, and fast turnaround times. Don’t risk your safety with worn-out brake fluid. Let the pros at Eric’s Car Care handle it.
Schedule your brake inspection or flush today by calling 713-667-9293 and drive with confidence!