
Replacing a faulty sensor is an important part of maintaining your vehicle’s engine health. If you notice warning lights or unusual oil pressure readings, it may be time for an oil pressure sensor replacement. This component helps monitor the engine’s oil pressure and ensures that critical engine parts remain properly lubricated. While some drivers choose to handle the repair themselves, others prefer professional help.
If you’re unsure about the process, search for auto repair Houston and get trusted oil change Houston services that offer diagnostic and replacement support to keep your vehicle running smoothly.
Signs of a Bad Oil Pressure Sensor
If you’re wondering, “Can you drive with a bad oil pressure sensor?” the car may still run, but it’s risky because a faulty sensor can hide a real low-oil-pressure problem that could damage the engine. Recognizing the early signs of a failing oil pressure sensor can help prevent engine damage and unnecessary repairs.
- Oil pressure warning light turns on or flashes even when the oil level is normal.
- Erratic or fluctuating oil pressure gauge readings.
- Oil leaking around the sensor is often caused by a worn seal or damaged sensor housing.
- Engine noise like ticking or knocking.
Read more: How Do I Clear the Change Oil Light
Tools for Oil Pressure Sensor Replacement
Before starting an oil pressure sensor replacement, having the right tools will make the job faster and safer. Here are the most important tools you may need:
- Oil Pressure Sensor Socket (1-1/16″ or 27mm): A specialized deep socket designed to remove and install the sensor without damaging it.
- Ratchet and Socket Set: Helps loosen and tighten the sensor during the oil pressure sensor replacement process.
- Wrench Set: Useful if the sensor is located in a tight space where a socket cannot fit.
- Thread Sealant: Helps create a proper seal when installing the new sensor to prevent oil leaks.
- Shop Towels: Used to clean oil spills and keep the work area clean during the replacement.
- OBD-II Scanner (Optional): Can help clear warning lights or check for error codes after the replacement is complete.
How to Replace Oil Pressure Sensor
Replacing a faulty sensor is a manageable task if you follow the correct steps. We have covered the basic process for oil pressure sensor replacement and helps ensure the job is done safely and correctly.
1. Preparation
Before changing the oil pressure sensor, make sure the vehicle is parked on a flat, stable surface and the engine is completely cool. Working on a hot engine can lead to burns and make the repair more difficult.
Gather all necessary tools, including an oil pressure sensor socket, ratchet, wrench set, thread sealant, and shop towels. It’s also a good idea to have the replacement sensor ready and verified for your vehicle’s make and model.
2. Disconnect Battery
Before working on the engine, disconnect the negative terminal of the battery. This prevents electrical issues, protects sensitive components, and ensures safety during the oil pressure sensor replacement process.
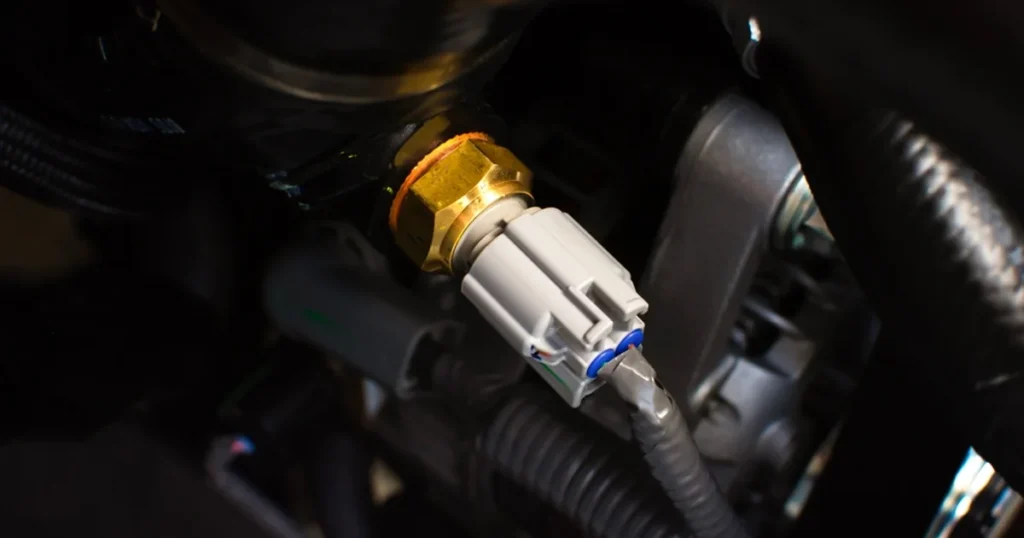
3. Locate the Sensor
Next, locate the oil pressure sensor on your vehicle. The oil pressure sensor is usually located near the oil filter, on the engine block, or sometimes on the cylinder head, depending on the vehicle design. Consult your vehicle owner’s manual or a repair guide to identify the exact location. The sensor is typically small and threaded into the engine with an electrical connector attached to it.
4. Remove Electrical Connector
Once you locate the sensor, carefully disconnect the electrical connector attached to it. Most connectors have a locking tab or clip that must be pressed or lifted before pulling it off. Avoid pulling on the wires directly. Instead, hold the connector housing and gently remove it from the sensor.
5. Remove the Sensor
Use an oil pressure sensor socket or the correct-sized wrench to loosen and remove the old sensor. Turn it counterclockwise until it comes out of the engine block. Be prepared for a small amount of oil to leak out, which is normal. Use shop towels or rags to clean the area and prevent oil from spreading onto other components.
Carefully inspect the old sensor after removal, as visible damage, oil contamination, or worn threads can indicate that the sensor was faulty.
6. Replace the Sensor
Before installing the new sensor, apply a small amount of thread sealant or Teflon tape to the sensor threads if recommended by the manufacturer. This helps prevent oil leaks and ensures a secure seal. Thread the new sensor into the engine by hand first. Hand-threading helps prevent cross-threading, which could damage the engine block.
7. Tighten / Torque
Once the sensor is properly threaded, use a socket or wrench to tighten it securely. Avoid overtightening, as this can damage the sensor or strip the threads in the engine block. If possible, use a torque wrench and tighten the sensor according to the manufacturer’s recommended torque specification. Correct torque ensures the sensor is firmly installed without causing mechanical damage.
8. Reconnect and Test
After installing the new oil pressure sensor, reconnect the electrical connector until it clicks and reattach the negative battery terminal. Start the engine, let it idle, and confirm the oil pressure warning light is off and the gauge reads normally. Check for any leaks around the sensor.
If you prefer professional help, search for “oil change near me”, the ASE-certified team at Eric’s Car Care can handle it, keeping your engine safe and running smoothly.
Get Professional Oil Pressure Sensor Replacement
A faulty sensor can lead to inaccurate readings and potentially hide serious lubrication problems, which is why scheduling a professional oil pressure sensor replacement is important.
If you’re searching for a trusted auto repair near me, the expert technicians at Eric’s Car Care are ready to help. With ASE-certified technicians and professional diagnostics, our team can handle your oil pressure sensor replacement quickly and accurately so you can get back on the road with confidence.