
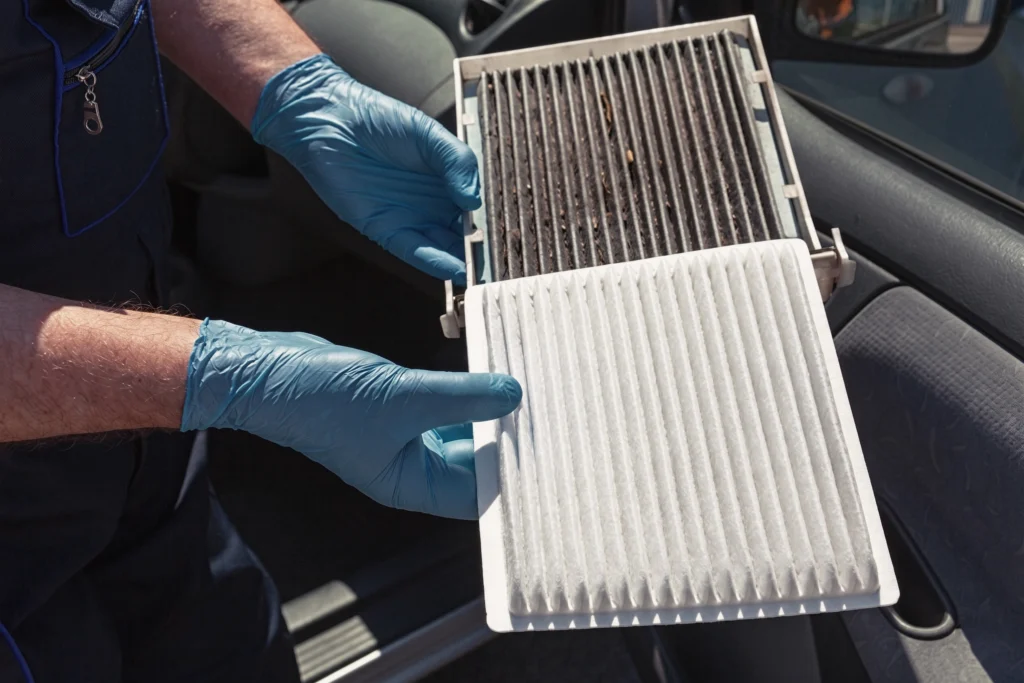
Changing a cabin air filter is one of the simplest maintenance tasks you can perform to improve your vehicle’s air quality and HVAC performance. It does not require advanced tools, and in most vehicles, it can be completed in just a few minutes. A clean cabin air filter ensures that the air entering your car is free from dust, pollen, and other harmful particles, making your driving experience healthier and more comfortable. If you would rather have a professional handle it, any trusted Auto Repair near me shop can replace it quickly and affordably during your next service visit.
Before starting, it is important to identify your vehicle’s filter location and understand the basic steps involved. While the process is generally straightforward, the exact placement may vary depending on the make and model of your car. Taking a few minutes to properly locate and access the filter can make the entire replacement process smooth and hassle-free.
What Is a Cabin Air Filter?
A cabin air filter is an important part of your vehicle’s ventilation system that cleans the air entering your car’s interior. It traps dust, pollen, pollution, and other airborne particles so you can breathe cleaner air while driving. This filter plays a key role in maintaining comfort, especially for drivers with allergies or those who frequently drive in heavy traffic or dusty environments.
Over time, the cabin air filter becomes clogged with dirt and debris, which can reduce airflow from your AC system and affect air quality inside the vehicle. Replacing it regularly helps ensure fresh air circulation and keeps your HVAC system working efficiently.
Signs Your Cabin Air Filter Needs Replacement
A dirty cabin air filter can affect both comfort and vehicle performance. If you notice any of the warning signs below, it is likely time for a replacement, and visiting a trusted AC repair near me shop ensures your filter and entire HVAC system are inspected and serviced properly at the same time.
- Weak airflow from the AC vents.
- Musty or unpleasant odors inside the car.
- Increased dust inside the cabin.
- Difficulty maintaining cool or fresh air.
- Foggy windows more often than usual.
If you notice any of these issues, it’s likely time for a replacement.
How Often Should You Replace the Cabin Air Filter?
Most manufacturers recommend replacing the cabin air filter every 12,000 to 15,000 miles, but this can vary based on driving conditions. If you drive in heavy traffic, dusty roads, or polluted areas, you may need to replace it more frequently.
Regular inspection during routine maintenance can help you avoid airflow issues and keep your cabin environment clean and comfortable.
Why Changing Your Cabin Air Filter Matters
Replacing your cabin air filter is a simple maintenance task that makes a big difference in your driving experience. A clean filter improves airflow, enhances air conditioning performance, and helps eliminate unpleasant odors inside the car. Over time, a clogged filter can restrict ventilation and reduce the comfort of your cabin environment, especially during long drives or in heavy traffic conditions. If your AC is still underperforming after a filter change, scheduling a professional AC repair Houston inspection can identify any deeper issues affecting your system.
Here is why it is important:
- Improved air quality: A clean filter removes dust, pollen, and pollutants from incoming air. This helps you and your passengers breathe cleaner, healthier air.
- Better AC performance: Clean filters allow proper airflow through the system. This helps your AC cool faster and maintain consistent cabin comfort.
- Reduced odors: Dirty filters trap moisture and debris, causing bad smells. Replacing them keeps your cabin fresh and odor-free.
- Less strain on the HVAC system: A clogged filter forces the system to work harder. This can reduce efficiency and increase wear over time.
- Health benefits: Cleaner air helps reduce allergens and irritants. It is especially beneficial for those with allergies or respiratory issues.
For additional insights on maintaining healthy air inside your vehicle, organizations like the Environmental Protection Agency provide valuable guidance on air quality and filtration systems.
How to Change Cabin Air Filter (Step-by-Step)
Changing a cabin air filter is usually a quick process that takes about 10–15 minutes, depending on your vehicle model. You don’t always need special tools, but careful handling is important. This simple maintenance task can significantly improve your vehicle’s air quality and HVAC performance when done correctly. Always make sure your car is parked safely before starting the process.
1. Locate the Cabin Air Filter
In most vehicles, the cabin air filter is located behind the glove box or under the dashboard. Some models may place it under the hood near the windshield. Check your owner’s manual if you are unsure. Different manufacturers place the filter in different locations, so identifying the correct spot is the first and most important step. Taking a moment to understand your vehicle layout will make the rest of the process much easier.
2. Open the Filter Housing
Carefully remove the glove box or access panel to reach the filter compartment. Most covers are secured with clips or small screws that can be removed easily. Be gentle while opening the housing to avoid breaking plastic clips or hinges. Keep all screws and small parts in a safe place so you can reassemble everything without difficulty.
3. Remove the Old Filter
Slide out the old cabin air filter slowly to avoid spreading dust or debris. If it looks dark, clogged, or dirty, it definitely needs replacement. You may notice leaves, dirt, or even small particles stuck inside the housing, which is completely normal over time. It’s a good idea to lightly clean the area before inserting the new filter.
4. Install the New Filter
Insert the new filter in the same direction as the old one. Make sure it fits snugly and aligns properly inside the housing. Most filters have airflow arrows printed on the side, so be sure to match the direction correctly. Improper installation can reduce airflow and affect AC performance.
5. Close and Secure Everything
Reinstall the cover or glove box and ensure everything is tightly secured. Once done, turn on your AC to check smooth airflow. Listen for any unusual sounds and ensure air is flowing evenly through the vents. If everything feels normal, the installation is completed.
Professional Cabin Air Filter Service at Eric’s Car Care
While changing a cabin air filter is simple for many vehicles, some models have harder-to-reach locations or require careful installation. A professional inspection ensures the filter is installed correctly and your AC system is working at peak performance.
At Eric’s Car Care, experienced technicians can quickly inspect and replace your cabin air filter as part of your routine maintenance service. They ensure proper fitment, clean airflow, and overall HVAC system efficiency so you can enjoy a healthier and more comfortable driving experience. Schedule your service today and keep your car’s air clean, fresh, and safe for every drive.